A distribution list is one of the most used and most misunderstood features in Exchange Online. It looks simple: one email address that reaches many people. But once your tenant grows past a few hundred users, poorly planned distribution lists cause mail loops, data leaks, orphaned groups, and endless help-desk tickets.
I’ve spent years administering Exchange environments, from small businesses to global enterprises migrating from on-premises servers. In this guide I’ll walk you through everything you need to build, secure, and maintain a distribution list in Exchange Online, including the mistakes I see most often.
Table of Contents
What Is a Distribution List in Exchange Online?
A distribution list (officially called a distribution group in Exchange Online) is a mail-enabled object that expands into multiple recipients. Send one message to sales@tenant365admin.com and Exchange Online delivers a copy to every member of the group.
There are a few key facts to understand:
- A distribution list is used only for email. It cannot hold permissions to SharePoint, Teams, or files.
- It doesn’t need a license. Groups are directory objects, so you don’t pay per group.
- Members can be internal users, mail contacts, mail users, or other groups, and nesting is supported.
- Exchange Online expands the list at delivery time, which means membership changes take effect almost immediately.
The last point matters for compliance. If someone leaves your organization and you remove them from the list, they stop receiving mail right away, though messages already delivered stay in their mailbox.
Types of Groups in Exchange Online
Choosing the wrong group type is the number one design mistake I see. Here is how the options compare.
| Group Type | Best For | Can Hold Permissions? | Membership |
|---|---|---|---|
| Distribution group | Simple email broadcasting | No | Static |
| Dynamic distribution group | Auto-updating lists (e.g., “All Sales staff”) | No | Rule-based |
| Mail-enabled security group | Email plus resource permissions | Yes | Static |
| Microsoft 365 group | Collaboration (Teams, Planner, SharePoint) | Yes | Static |
| Shared mailbox | Shared inbox, not a list | Via mailbox permissions | N/A |
Rule of thumb: if you only need to email people, a standard distribution list is the lightest, cheapest option. If membership should follow attributes like department or country, use a dynamic distribution group. If people need to collaborate on files and conversations, use a Microsoft 365 group.
How to Create a Distribution List in the Exchange Admin Center
The Exchange admin center (EAC) is the quickest route for one-off groups.
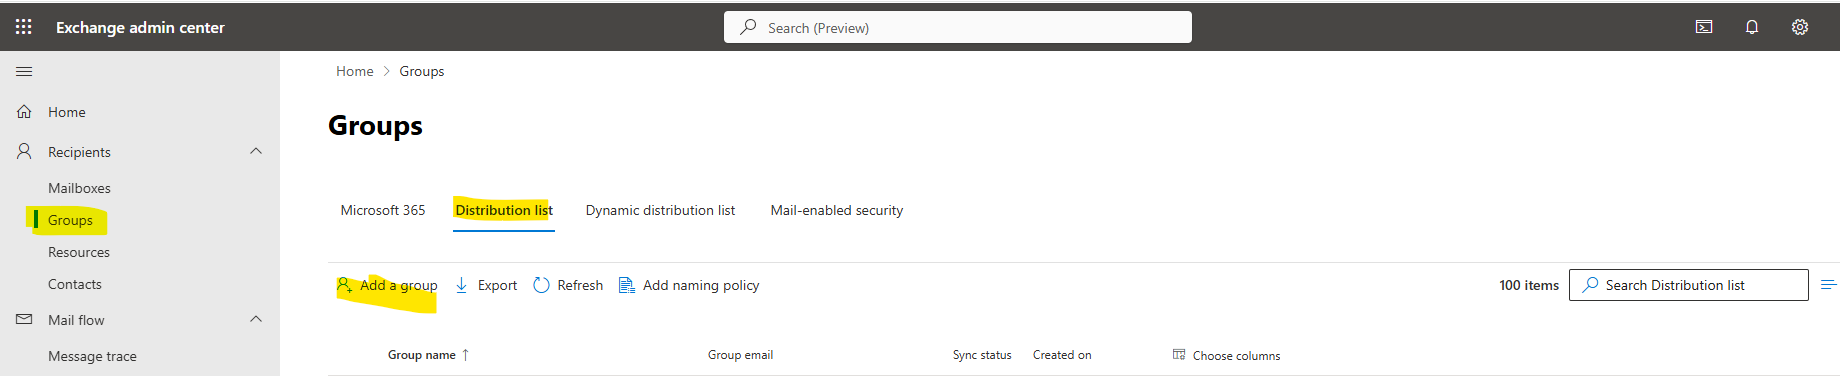
- Sign in to the Exchange admin center at https://admin.cloud.microsoft/.
- Go to Recipients > Groups.
- Select Add a group.
- Choose Distribution and click Next.
- Enter a name, description, and owner(s).
- Add members.
- Set the email address, choose the domain, and configure whether people outside your organization can send to the group.
- Review and select Create group.
Two settings on that last screen deserve careful thought. The first is owners. Always assign at least two, so the group never becomes orphaned when one person leaves. The second is external sender access. Leave it disabled unless you truly need customers or vendors to email the list.
Create a Distribution List with PowerShell
For bulk operations and repeatable builds, PowerShell is far better. Connect first:
Connect-ExchangeOnline -UserPrincipalName admin@contoso.comThen create the group:
New-DistributionGroup -Name "Sales Team" -Alias "salesteam" -PrimarySmtpAddress "sales@contoso.com" -ManagedBy "jane@contoso.com","mark@contoso.com" -Members "user1@contoso.com","user2@contoso.com" -Type DistributionTo add a member later:
Add-DistributionGroupMember -Identity "Sales Team" -Member "newhire@contoso.com"To review who is in a distribution list:
Get-DistributionGroupMember -Identity "Sales Team" -ResultSize UnlimitedScripting your distribution list creation gives you naming consistency and an audit trail, and it lets you build groups from a CSV in minutes instead of hours.
Dynamic Distribution Lists: Automate Membership
If you’re still manually adding new employees to “All Staff,” you’re wasting time. A dynamic distribution group builds its membership at send time from a recipient filter.
New-DynamicDistributionGroup -Name "All Mumbai Staff" -PrimarySmtpAddress "mumbai-staff@contoso.com" -IncludedRecipients MailboxUsers -ConditionalCity "Mumbai"You can filter on attributes such as department, company, country, and custom attributes. To preview who will receive mail:
$dl = Get-DynamicDistributionGroup "All Mumbai Staff" Get-Recipient -RecipientPreviewFilter $dl.RecipientFilterExpert tip: dynamic groups are only as accurate as your directory data. If HR doesn’t keep the department and city attributes clean, your dynamic distribution list will silently miss people. Audit those attributes before relying on the group for anything important, such as emergency notifications.
Securing Your Distribution List
An unsecured distribution list is a real risk. Anyone who can send to all-staff@ can send a phishing message that appears to reach the whole company. Apply these controls.
1. Restrict Who Can Send
Set-DistributionGroup -Identity "All Staff" -AcceptMessagesOnlyFromSendersOrMembers "hr@contoso.com","ceo@contoso.com" -RequireSenderAuthenticationEnabled $trueSetting RequireSenderAuthenticationEnabled to $true blocks anonymous external senders.
2. Enable Moderation
Set-DistributionGroup -Identity "All Staff" -ModerationEnabled $true -ModeratedBy "comms@contoso.com"Moderators approve or reject messages before they reach members, which is ideal for company-wide lists.
3. Lock Down Membership Changes
Set-DistributionGroup -Identity "Sales Team" -MemberJoinRestriction Closed -MemberDepartRestriction ClosedA closed group prevents users from adding or removing themselves.
4. Hide from the Address List When Appropriate
Set-DistributionGroup -Identity "Executive Team" -HiddenFromAddressListsEnabled $trueHiding a distribution list only removes it from the Global Address List. Anyone who knows the address can still send to it, so combine hiding with sender restrictions.
Send As and Send on Behalf for Groups
Sometimes a department wants to send mail from the group address. Exchange Online supports two models:
- Send As: the message appears to come directly from the group.
- Send on Behalf: the message shows “User on behalf of Group.”
Grant Send As with:
Add-RecipientPermission -Identity "Sales Team" -Trustee "jane@contoso.com" -AccessRights SendAs -Confirm:$falseGrant Send on Behalf with:
Set-DistributionGroup -Identity "Sales Team" -GrantSendOnBehalfTo "jane@contoso.com"Permissions can take some time to propagate, so if a user still gets a “permission denied” error, wait a while before troubleshooting further.
Limits Every Admin Should Know
Understanding service limits prevents surprises when a distribution list goes wrong.
- Message size: the default maximum is 150 MB for send and receive, though smaller limits are often set by policy.
- Recipient limit per message: By default, Exchange Online allows up to 500 recipients per message, and you can raise this to a maximum of 1,000. A distribution list in the organization’s address book counts as one recipient toward this limit. However, for the Tenant External Recipient Rate Limit (TERRL), which caps how many external recipients your tenant can email per day, each external member of the group is counted individually.
- Tenant external recipient rate: the daily external recipient limit applies to a tenant, so mass mailings to external contacts through a large list can be throttled.
- Nesting: groups can be nested, but deeply nested lists are difficult to audit and troubleshoot.
Microsoft adjusts these values over time, so verify the current numbers in Microsoft’s Exchange Online limits documentation before designing anything mission-critical.
Migrating a Distribution List from On-Premises to Exchange Online
In hybrid environments, this is where most confusion occurs. If a distribution list is synchronized from on-premises Active Directory through Microsoft Entra Connect, the on-premises object is the source of authority. You must manage it on-premises, not in the cloud. Attempts to edit membership in Exchange Online will fail or be overwritten at the next sync.
A safe migration approach looks like this:
- Inventory every group with
Get-DistributionGroup -ResultSize Unlimited | Export-Csv. - Identify unused, empty, and orphaned lists. Delete them instead of migrating clutter.
- Decide on the target: keep as a synced distribution list, recreate as cloud-only, or convert to a Microsoft 365 group.
- Test mail flow with a pilot group first.
- Communicate any change of address or ownership to the business.
For a cloud-only distribution list, you can also upgrade it to a Microsoft 365 group from the EAC when users need Teams or shared files, and the upgrade keeps the email address intact.
Common Distribution List Problems and Fixes
“My distribution list isn’t receiving external email.”
Check that external senders are allowed. By default, groups accept mail only from authenticated internal senders.
“A member says they never got the message.”
Run a message trace in the Exchange admin center. Check for mailbox rules, junk-folder delivery, or an earlier removal from the group.
“We have a mail loop.”
This usually happens when two distribution lists contain each other, or an auto-forward rule sends mail back to the group. Break the nesting and review forwarding rules.
“I can’t find the group in Outlook.”
It might be hidden from address lists. Check the HiddenFromAddressListsEnabled property, and remember that changes to the Global Address List can take time to appear in cached Outlook clients.
“Nobody owns this list.”
Run a report of groups with empty ManagedBy values and assign owners:
Get-DistributionGroup -ResultSize Unlimited | Where-Object {$_.ManagedBy.Count -eq 0}Best Practices for Managing a Distribution List
After many tenant audits, these are the habits that separate clean environments from chaotic ones.
- Use a naming convention. Prefixes such as
DL-Sales-Teammake a distribution list easy to find and sort. - Assign two or more owners to every group.
- Review membership every quarter. Ask owners to confirm the list is still accurate.
- Prefer dynamic groups for organization-wide lists so joiners and leavers update automatically.
- Restrict senders on any list that reaches more than a few dozen people.
- Document the purpose in the group’s notes field so future admins understand why it exists.
- Retire stale groups. If no mail has flowed through a list in six months, it is a candidate for deletion.
- Use Microsoft 365 groups for collaboration and reserve the classic distribution list for broadcasting.
Distribution List vs. Microsoft 365 Group: Which Should You Choose?
This question comes up in nearly every project. Pick a distribution list when you want a simple, low-overhead broadcast address such as announcements@. Pick a Microsoft 365 group when members need a shared calendar, file storage, or a Teams workspace.
Microsoft 365 groups offer more features but carry more governance overhead, including expiration policies, naming policies, and guest access settings. A distribution list has far fewer moving parts, which makes it simpler to audit. For many business processes, simple is exactly right.
Reporting and Auditing Your Distribution Lists
You can’t manage what you can’t see. Export a full report of your groups and their membership counts:
Get-DistributionGroup -ResultSize Unlimited | ForEach-Object {
  [PSCustomObject]@{
    Name = $_.DisplayName
    Email = $_.PrimarySmtpAddress
    Members = (Get-DistributionGroupMember $_.Identity -ResultSize Unlimited).Count
    Owners = ($_.ManagedBy -join ";")
  }
} | Export-Csv DL-Report.csv -NoTypeInformation
Review this report each quarter. Empty groups, groups with hundreds of members and no owner, and groups that any sender can email are the three categories that deserve immediate attention.
Frequently Asked Questions (FAQ)
1. What is a distribution list in Exchange Online?
It is a mail-enabled group that sends one email to many recipients at once. Microsoft calls it a distribution group, and it needs no license.
2. Does a distribution list need a license in Microsoft 365?
No. Distribution groups, dynamic distribution groups, and mail-enabled security groups don’t require a per-group license.
3. What is the difference between a distribution list and a Microsoft 365 group?
A distribution list only distributes email. A Microsoft 365 group also provides a shared mailbox, calendar, SharePoint site, and optional Teams integration.
4. How many members can a distribution list have?
Exchange Online doesn’t set a small hard cap on members, but tenant sending limits and message recipient limits apply, so check Microsoft’s current documentation for exact figures.
5. Can external users send email to my distribution list?
Yes, but only if you allow it. By default, external senders are blocked. Change this setting carefully to avoid spam and phishing exposure.
6. Can I convert a distribution list to a Microsoft 365 group?
Yes. Eligible cloud-managed lists can be upgraded from the Exchange admin center, and the email address is preserved.
7. Why can’t I edit a distribution list in Exchange Online?
If the group is synced from on-premises Active Directory, it must be edited on-premises. Cloud edits won’t work for synced objects.
8. How do I create a dynamic distribution list?
Use the Exchange admin center or run New-DynamicDistributionGroup in PowerShell, then define a recipient filter based on attributes like department or city.
9. How do I see which distribution lists a user belongs to?
Use Get-Recipient with a filter on Members and the user’s distinguished name, or check the user’s membership in the Exchange admin center.
10. How do I stop people from adding themselves to a distribution list?
Set MemberJoinRestriction to Closed, which prevents users from joining without owner approval.
Final Thoughts
A well-designed distribution list saves time, reduces errors, and keeps communication flowing. A neglected one becomes a security hole and a support burden. Start by choosing the right group type, lock down who can send, automate membership where you can, and audit regularly. Do those four things and your Exchange Online environment will be cleaner than most.
If you’re planning a large cleanup or a migration from on-premises Exchange, begin with an inventory. You’ll almost always find that a third of your groups are unused.
Exchange Online Connector: Proven Guide to Secure Mail Flow
Message Header Analyzer: The Only Truth Behind Every Email Issue
SMTP Relay Office 365: Ultimate Expert Guide to Secure & Powerful Email Delivery
